Blog
The 5-Step Prep for Getting the Most Out of Your AC Outdoor Unit This Year

 We all want our air conditioner to run at peak efficiency to save as much money as possible on cooling bills. Many homeowners change the filter on their air conditioner and think it’s good to go. But if you really want the most bang for your buck, you can’t forget the outdoor part of your air conditioner - the condenser.
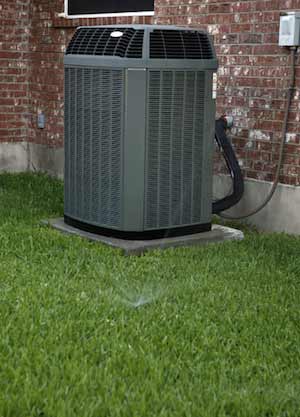
The condenser is the part of your air conditioner that’s housed in the large metal box located next to your home. The pros at Home Comfort Experts have put together this 5-Step Prep list to help make sure your outdoor unit is cleaned and ready to give you its best this year.
Step 1: Condenser Safety Precautions
Before you do any work on your outdoor unit, turn off the electrical power to it at the panel. Also turn off the disconnect box located outside, near your unit. This 240-volt box will contain either a lever, fuses, or a circuit breaker to shut off the condenser.
Then, allow about 30 minutes for the electrical charge that’s stored in the condenser’s capacitor to dissipate. Now, it’s safe to mess with the unit.
Step 2: Clean & Clear Debris
If your unit was not protected by a tarp or other cover, it has most likely accumulated some debris over the long winter.
- Clear out any leaves, dirt, sticks, etc.
- Check the fan to make sure it is also clear of debris.
- Inspect your unit for a drain and make sure it is clear.
- Clean the fan blades with a vacuum or rag.
- Tighten any loose bolts where the fan is mounted. If the fan motor has oil ports, put a few drops of lightweight oil into the ports to lubricate them.
- Clean up any excess water inside the unit, then reassemble the condenser.
Step 3: Clean the Condenser Coils
Check your coils and clean any dirt on them. Dirt or debris that obstructs the flow of air will lower the unit’s efficiency. To clean the coils, you will have to remove the side and top panels with a screwdriver. The fan is attached to the top, and it may be heavy! Make careful not to pull on the wires attached to the fan.
Use a soft brush to gently clean the coils from the outside of the unit. The fins you see help dissipate heat from the unit as quickly as possible and are extremely delicate. Do not to bend the fins. If your fins are damaged, you can use a special comb called a fin comb to straighten them.
Clean the coils from the outside and then again from the inside to remove all dirt. If your unit is filthy and the dirt doesn’t seem to me coming off with a soft brush, you can use a commercial coil cleaner to loosen the dirt and spray with a hose with a nozzle you can adjust for pressure. Spray from the inside out, but cover the fan motor and any electrical components with a plastic bag to keep them from getting wet.
If your unit is surrounded by bushes, trim them back at least a foot from the unit to ensure good airflow.
Related Read: Think a Bigger Air Conditioner Is Better? Think Again
Step 4: Check the Coolant Lines
The refrigerant tubes (pipes that connect the condenser unit outside to the evaporator on the inside unit) are usually covered with foam insulation to keep them from losing energy. If any insulation is frayed or missing, replace it. You can use foam sleeves or foam insulation tape - both found at any home improvement store.
Step 5: Test the Unit
Allow the unit to dry thoroughly before turning it on for testing.
- First, turn the thermostat in your home to OFF.
- Then turn on the power at both the disconnect box and at the main panel.
- Last, switch the thermostat to COOL.
Give it some time and see if you feel cool air blowing from the ducts. You can also check your outdoor unit to see if the air blowing out the top is warmer than the surrounding air.
Another way to test your AC is to check the copper lines on the outdoor unit. You should have two copper lines, one thin and one thicker. The thicker line is the suction line and it should feel cooler to the touch than the outside air around it. Of course, the best test is to let it run and see if your home feels cool and comfortable.
Don’t forget to make sure your inside filter is clean as well. You’ll not only have better efficiency, but cleaner air to boot!


